Guide
SPX Slayer Dashboard: A Complete Walkthrough
Walk through every panel and value on the SPX Slayer dashboard — the three-column layout, hero price, GEX regime, VWAP tint, and freshness indicators.
The SPX Slayer dashboard is a three-column 0DTE command center. Every number, pill, and color on screen exists because it feeds a trading decision — nothing decorative makes the cut. This walkthrough explains what each element means so you can read the board cold.
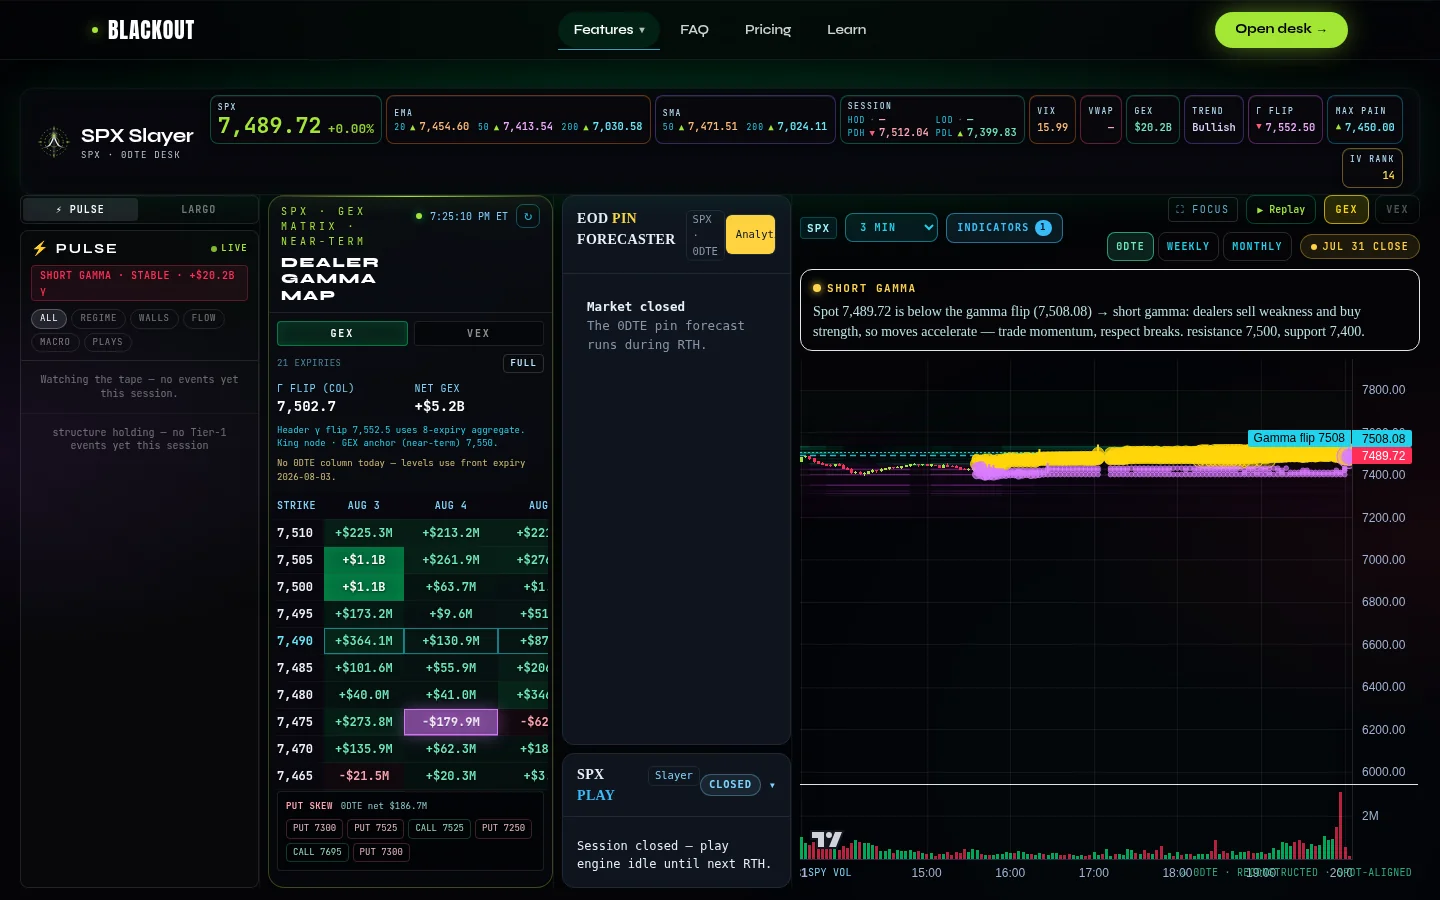
The three-column layout
Left column — GEX/VEX matrix. A strike-by-expiry grid of signed gamma (or vanna) exposure, color-coded from deep red (heavy put gamma) to deep green (heavy call gamma). Key levels — the gamma flip, call wall, and put wall — are highlighted. See Reading the SPX Slayer GEX Matrix.
Center column — play engine. Graded setups showing ticker, direction, strike, expiry, confluence grade (A+ through D), score, confidence percentage, and action state (SCANNING, WATCHING, BUY, HOLD, TRIM, SELL). Positioning data from the left feeds the grading engine; the output is a filtered list of plays worth watching. See SPX Slayer Play Grades Explained.
Right column — Largo commentary. Largo AI provides a running narrative — regime reads, level commentary, and context for why the engine is or isn't firing. See tips for getting better answers from Largo. During RTH it updates as conditions change; outside market hours it summarizes the prior session.
The hero bar
Across the top of the dashboard sits the hero bar — the five-second read on where SPX stands right now.
Hero SPX price. The large number front and center. It updates in near-real-time via SSE and shows the last traded price for SPX.
VIX pill. A badge showing the current VIX level — the market's 30-day implied volatility read for SPX. VIX under 15 usually means calm; above 25 means volatility is elevated and premiums are rich.
VWAP pill. SPX's volume-weighted average price for the session. The pill tints green (bull) when price is above VWAP and red (bear) when below — a quick institutional-level posture read without opening a chart.
Net GEX. The aggregate gamma exposure number for the SPX chain. Positive means dealers are long gamma (expect range compression); negative means short gamma (expect amplification). This single number sets the session's baseline character.
Technical levels strip
Below the hero bar, a strip of reference levels gives you the day's structural map:
- EMA 20 / 50 / 200 — exponential moving averages on SPX. The stack order (20 above 50 above 200, or inverted) tells you whether the short-term, intermediate, and long-term trends agree or conflict. - SMA 50 / 200 — simple moving averages. When the SMA 50 crosses above the SMA 200 (a "golden cross") or below it (a "death cross"), the event shows up here as a reference. - HOD / PDH — today's high of day and the prior day's high. Price breaking above PDH is a momentum tell; failing at it is resistance. - LOD / PDL — today's low of day and the prior day's low. A break below PDL signals continuation weakness; holding it suggests support.
These levels are inputs into the play engine's confluence scoring. You don't need to memorize them — the grading system weighs them for you — but seeing them lets you understand why a grade came out the way it did.
Freshness indicator and market status
Data freshness matters on a 0DTE desk. The freshness chip in the header shows one of three states:
- Live (green) — data is current and streaming. The board is tradeable. - Stale (amber) — data hasn't updated within the expected window. Treat the board with caution. - Offline (red) — the data feed is disconnected. Do not trade off stale data.
Next to the chip, the market status indicator shows whether RTH is active, pre-market, after-hours, or closed.
Regime indicator
A badge showing the current gamma regime — positive or negative — so you know in one glance whether the session favors fading or following. This is derived from the net GEX sign and the position of price relative to the gamma flip.
Trading halt banners
If SPX or a major component triggers a trading halt (circuit breaker or single-stock LULD), a red banner appears across the top. Halts mean the order book is frozen — no fills, no hedging, no reliable pricing. The play engine pauses grading until the halt lifts.
Putting it together
Read the dashboard top-down: hero bar for the five-second pulse, technical strip for context, left column for positioning, center for actionable plays, right for narrative. Before looking at any individual play, glance at the regime indicator and net GEX — they set the day's playbook. For the full story on grading, see SPX Slayer Play Grades Explained. For the specialized morning and late-session engines, see Lotto & Power Hour Plays. New to BlackOut? Getting Started walks through the platform end to end. Get access →
BlackOut provides educational tools and market analysis only and does not provide investment advice. Options trading involves substantial risk and is not suitable for every investor.
Related guides
SPX Slayer Play Grades: A+ Through D Explained
How SPX Slayer's confluence grading works — score, confidence, gate logic from GEX regime through BlackOut Intelligence, and what each grade means for sizing.
Gamma Flip Explained: The Single Most Important Level on the Board
The gamma flip is the price where dealers switch from stabilizing the market to amplifying it. Learn to find it and why it defines the character of the day.
Getting Better Answers from Largo AI
Tips for getting structured, data-grounded answers from Largo AI: effective queries, tool traces, pre-market prep, intraday reads, and post-session review.
VIX Explained: The Market's Fear Gauge
The VIX measures 30-day implied volatility on SPX options. Learn VIX regimes, its relationship to gamma, and how BlackOut uses VIX in 0DTE gating.
Ready to trade with live dealer gamma?
See plans and open the desk — SPX Slayer from $49/mo.
View pricing →